Is your computer having problems with its graphics card? Maybe your games are crashing, your videos are stuttering, or you see weird visual artifacts. If so, you can try to fix the problem by rolling back your GPU driver.
A GPU driver is a software program that helps your computer use its graphics card. It’s essential to keep your GPU driver up to date, but sometimes updates can cause problems. If you have issues with your GPU driver, you can roll it back to a previous version.
In this article, we’ll learn how you can easily roll back the GPU driver to its previous version. So, let’s take a look.
How To Roll Back GPU Driver on Windows 11/10/7
You can roll back the Nvidia, AMD, or Intel GU driver by using the below method;
Method 1: Using Device Manager
Using the device manager, you can roll back the GPU driver whether you are using Nvidia, AMD, or Intel. To do so, follow the below steps;
Step 1: Open Start on Windows 11/10/7 or press your keyboard’s Windows + X keys.
Step 2: Search for Device Manager and click the top result to open the app.
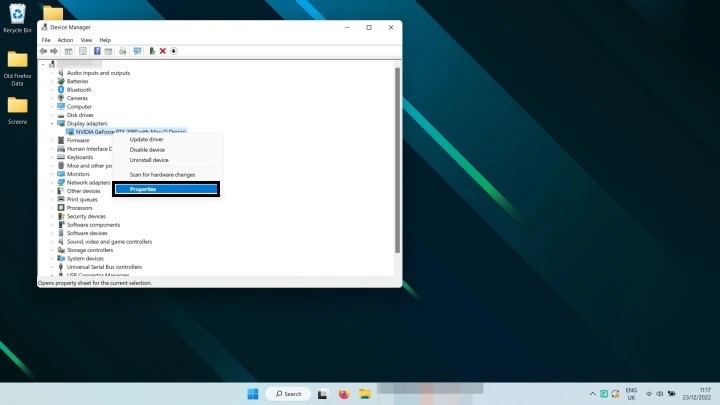
Step 3: Expand the “Display adapters” category with the driver to roll back on Windows 11/10/7.
Step 4: Right-click the Nvidia graphics adapter and select the Properties option.

Step 5: Click the Driver tab.
Step 6: Click the “Roll Back Driver” button.

If the option is grayed out, the system doesn’t have a previous version of the driver.
Step 7: Select a reason for rolling back the Nvidia/AMD/Intel driver.
Step 8: Click the Yes button.
After you follow the steps, your computer will return to the older Nvidia graphics driver, and the problematic new one will disappear. This will fix the issue of your computer using too much CPU on Windows 11.
For Windows 7 Users;
Windows 7 users can also roll back the Nvidia driver by following the below steps;
Step 1: Click Start
Step 2: Click Control Panel
Step 3: Windows Vista: Click System and Maintenance and then System or simply System (in Classic view). Windows 7: Click System and Security and then System.
Step 4: In the left pane, click Device Manager
Step 5: Double-click on Display Adapters
Step 6: Double-click on your NVIDIA GPU
Step 7: Select the Driver Tab
Step 8: Click on Roll Back Driver.
For Windows XP Users;
Windows XP users can also roll back the Nvidia, AMD, and Intel drivers by following the below steps;
Step 1: Click Start
Step 2: Click Control Panel
Step 3: Click Performance and Maintenance and then System (in Category view) or System (in Classic view)
Step 4: Select the Hardware Tab
Step 5: Click Device Manager
Step 7: Double-click on Display Adapters
Step 8: Double-click on your NVIDIA GPU
Step 9: Select the Driver Tab
Step 10: Click on Roll Back Driver
What To Do If Roll Back Driver is Greyed Out?
If the button to go back is gray and doesn’t work, the computer can’t find the older NVIDIA driver by itself. In that case, you must get the old driver and put it on your computer. Just follow these steps to learn how to do it on Windows 10:
Step 1: Press Windows + X > Device Manager.
Step 2: Double-click Display Adapters > Right-click NVIDIA > Update Driver.

Step 3: Select Browse my computer for driver software.
Step 4: Click Browse > Select the downloaded NVIDIA driver you got from the manufacturer’s website > Open.
Step 5: Click Next to process and wait for Windows to install the drivers. Right-click the NVIDIA driver > Properties > Driver tab > and look for the version when done.
Step 6: Restart the system to apply the change.
Issues You Can Face Due to Installing Old NVIDIA Drivers
- Encountering Blue Screen of Death (BSOD) when attempting to play games.
- Decreased Frame Rates per Second (FPS).
- Sudden interruptions when playing specific games.
Usually, when you update the driver on your computer, it makes things work better and faster. But because every computer is different, sometimes updates can cause problems. If that happens, it’s a good idea to return to the way the driver was before to fix those issues.


