Sometimes, games need to run with administrator privileges to work correctly. This means that the game needs to have complete control over your computer.
There are a few reasons why a game might need administrator privileges. For example, the game might need to install files to your system drive, or it might need to access protected system resources.
If you’re having problems with a game, such as crashes or freezes, you can try running it as an administrator.
In this article, we have come up with the most straightforward methods through which you can quickly run the game as an admin. So, let’s dive in.
Why Do I Need To Run the Game As An Administrator?
If your game on Windows doesn’t start, it might not have enough permission to do its job. It can’t get into certain places or change things because it doesn’t have the proper permission. But if you run the game as an admin (like a computer superhero), it gets special powers to go anywhere and fix things without any problems.
How To Run the Game As An Administrator
Here are some of the methods through which you can run the game as an administrator.
Method 1: Using Context Menu Option
You can run any game with elevated privileges by selecting a Run as administrator context menu option. To do so, follow the below steps;
Step 1: Open the game’s installation folder in File Explorer.
Step 2: Right-click the game’s EXE (application) file and select Run as administrator to launch it.
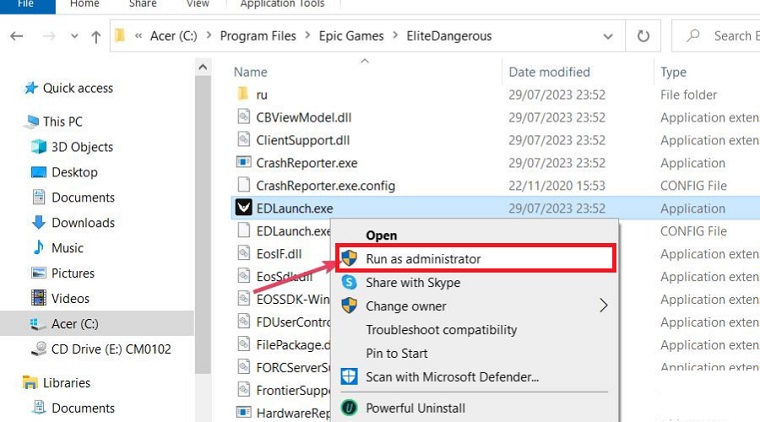
If your game has a desktop shortcut, you can also select Run as administrator by right-clicking that icon. However, you can’t select a Run as administrator context menu option for internet (URL) gaming shortcuts on the desktop.
Method 2: Using Task Manager
To run the game as an administrator by using task manager, you have to follow the below steps;
Step 1: Click the taskbar with the right mouse button and select Task Manager.
Step 2: Click Task Manager’s File menu.
Step 3: Select Run new task to bring up the window shown directly below.

Step 4: Click Browse to select a game’s EXE file.
Step 5: Select the Open option.
Step 6: Click the Create this task with administrative privileges setting to select that checkbox.

Step 7: Press OK to run the selected game as an administrator.
Method 3: Permanently Set A Game To Run As Administrator
You don’t have to choose “Run as Administrator” every time you play a game, as we discussed in methods one and two. Instead, you can make a game or its particular program always start with administrator permissions by doing this.
To do so, follow the below steps;
Step 1: Bring up a game’s installation directory (or client software) in File Explorer.
Step 2: Right-click a game’s or client software’s EXE application file that launches it to select Properties.

Step 3: Select Compatibility within the window’s tab bar.
Step 4: Click on the Run this program as an administrator box to select that setting.
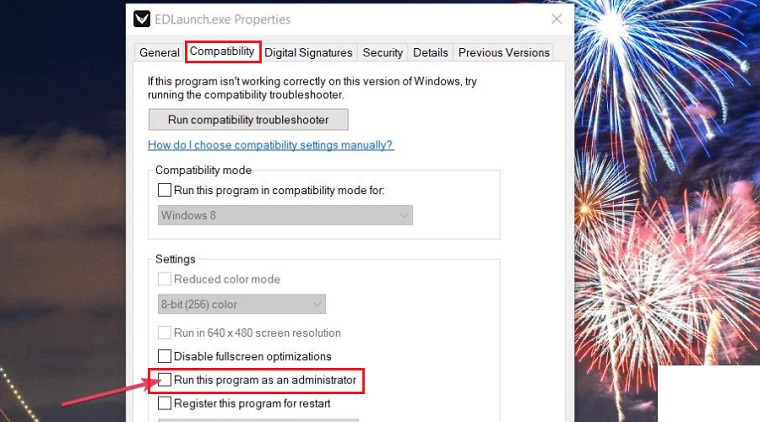
Step 5: Press the properties window’s Apply button to set the new compatibility setting.
Step 6: Click OK to exit the game’s properties window.
You can also permanently set games to run as administrators with their desktop shortcuts much the same. To do so, follow the below steps;
Step 1: Right-click the desktop shortcut for a game to select Properties.
Step 2: Then you can select Run this program as administrator on the desktop shortcut’s Compatibility tab just the same.
How To Run the Game As An Administrator as a Standard User Account
If you’re using a regular user account and you click “Run as administrator,” you’ll need to type in a PIN or password for an admin account. So, you should have an admin account with a password that you know to run programs with special rights.
If you don’t have a password or PIN for an admin account, you can create a new one or switch your current user account to an admin one. You can change a regular user account to an admin account. To do so, follow the below steps;
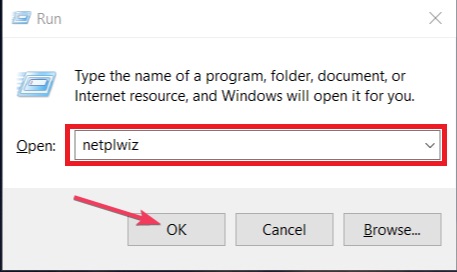
Step 1: Press Windows + R, input “netplwiz“, and click OK to view a User Accounts window.
Step 2: Select your user account and click Properties.

Step 3: Click Group Membership to view that tab.
Step 4: Select the Administrator radio button.
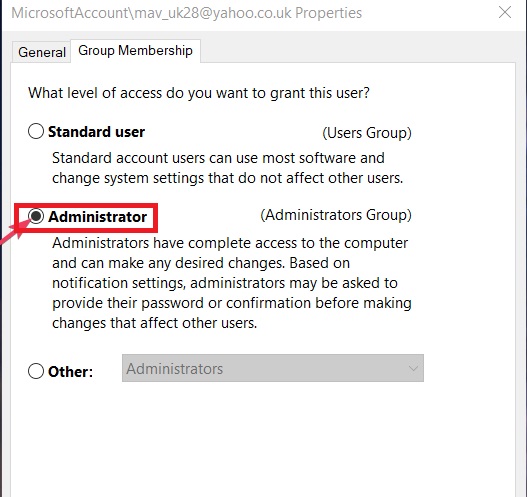
Step 5: Click Apply to change the user account type.
Step 6: Select OK on the account windows.
Why I Can’t Run a Program As An Administrator in Windows 11?
Once in a while, other programs like antivirus software can cause an issue with the “Run as administrator” feature in Windows 11. But you can fix it by adding the game to the list of allowed apps in the antivirus settings. Alternatively, you can temporarily turn off the antivirus to run the game with administrator privileges.
How Do You Get Full Administrator Rights in Windows 11?
To get full administrator rights, follow the steps below:
Step 1: Press on Win + S, go to Settings and Click on Accounts.
Step 2: Go to Family & Other Users and press on Change Account Type.
Step 3: Under Account Type, select Administrator and save it by pressing OK.
Step 4: Sign into your administrator account.
How To Run Steam Games as an Administrator on Windows 11
To run Steam games as administrator on Windows 11, set the game to run as administrator permanently. To do so, follow the below steps;
Step 1: Open the Steam Library.
Step 2: Right-click on the game you want to run as administrator, and inside the folder, look for the .exe file.
Step 3: Follow the instructions from Method 3.
Why Can’t I Run Games Downloaded From MS Store With Admin Rights?
Games you get from the Microsoft Store are Universal Windows Platform (UWP) apps, and you can’t choose to run them with admin rights. On the other hand, all games from Steam are desktop apps, so you can run them with administrative rights if needed.
Usually, you don’t have to give Windows games admin permission. But there might be times, especially if a game doesn’t start, when you need to do it. This is more likely if you see an Access Denied error message after trying to run a game.
