A GPU driver is a software program that allows your computer to communicate with your graphics card. GPU drivers are essential for gaming, video editing, and other graphics-intensive tasks. However, sometimes, GPU driver old versions can cause problems like crashes, performance issues, or visual artifacts.
If you’re experiencing problems with your GPU driver efficiency, try updating it to latest version. This can be done using the Device Manager in Windows.
In this article, we’ll show you how to update your GPU driver using the Device Manager. We’ll also provide some tips on how to troubleshoot GPU driver problems.
How To Update GPU Driver on Windows 11/10/7
To update the GPU driver whether you use the GPU of Nvidia, AMD, or Intel, there are different methods by which you can update your GPU driver. Here are some effective & easy rolling-back ways;
Method 1: Using Device Manager
Step 1: Open Start on Windows 11/10/7 or press your keyboard’s Windows + X keys.
Step 2: Search for Device Manager and click the top result to open the app.
Step 3: Expand the “Display adapters” category with the driver to update on Windows 11/10/7.
Step 4: Right-click the Nvidia graphics adapter and select the Update Driver option.

Step 5: Once the Update Driver Wizard loads, select the Search automatically for drivers option. This process might take a couple of minutes.
Step 6: If Windows finds an update for your GPU driver in the database, it will download it. From there on, follow onscreen instructions, which depend on the brand and model of your GPU.
Just remember that using Device Manager to update the GPU driver is not the best solution since Windows often cannot find updates even though they are available.
After you follow the steps, your computer will update to the new Nvidia graphics driver, and the problem will disappear. This will fix the issue of your computer using too much CPU on Windows 11.
Method 2: Using Driver Updater Tool (Easiest Method)
The driver update tool saves you much time and makes the process easy with one click. This tool automatically scans and detects outdated drivers on your PC.
Such tools can be life savers since you don’t need to do anything manually and worry if you are maximizing the performance of your GPU and other devices.
Outbyte Driver Updater is software that will keep all of your drivers updated. This swift and reliable software makes driver monitoring and management easy!
Step 1: Download Outbyte Driver Updater to your computer.
Step 2: After downloading, open Outbyte Driver Updater; the software will scan and find the most suitable drivers for your PC.
Step 3: If it detects outdated drivers, it will list them. Click on the Update button with the graphics driver selected
That’s it! Using Outbyte Driver Updater, you can keep your drivers updated and your system optimized for gaming!
Method 3: Using Official Driver Sources
You can use the official driver sources to update the GPU driver, whether using Nvidia, AMD, or Intel drivers. To do so, follow the below steps;
For Nvidia Users;
Step 1: Open the Official Drivers page on the Nvidia website.
Step 2: Provide information about your GPU by selecting the options from dropdown menus.

Step 3: Choose your operating system from the dropdown menu.
Step 4: Select Game Ready Driver (GRD) from the dropdown menu.
Step 5: Select your desired language.
Step 6: Click on the Search button.

Step 7: Nvidia will find the latest update for your GPU and take you to the download page. Click on the download button.

Step 8: After the download is completed, open the downloaded file.
Step 9: Select Custom Installation and choose Clean Installation. This way, old drivers will be removed.
Step 10: After the installation is completed, restart your PC.
For AMD Users;
Step 1: Open the AMD Drivers and Support page.
Step 2: Scroll down to the Search for your product label.
Step 3: Type in the name of your GPU and select it from the dropdown menu.

Step 4: If you can’t find your GPU, select your GPU model using the product list.
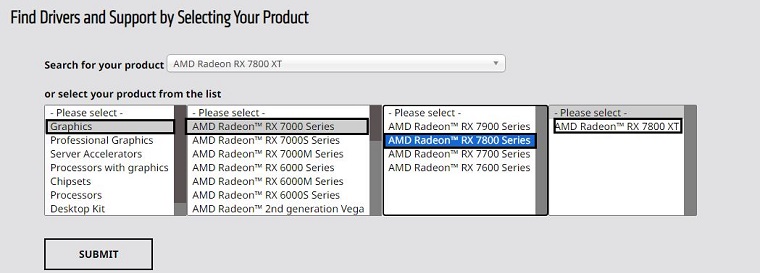
Step 5: After selecting your GPU, click on the Submit button.
Step 6: AMD will find your GPU’s newest driver and take you to the download page. Select your operating system by clicking on the corresponding label.
Step 7: Click on the Download button.

Step 8: After downloading, open the installation package and follow the onscreen instructions to install drivers.
Step 9: Once the drivers are installed, restart your PC.
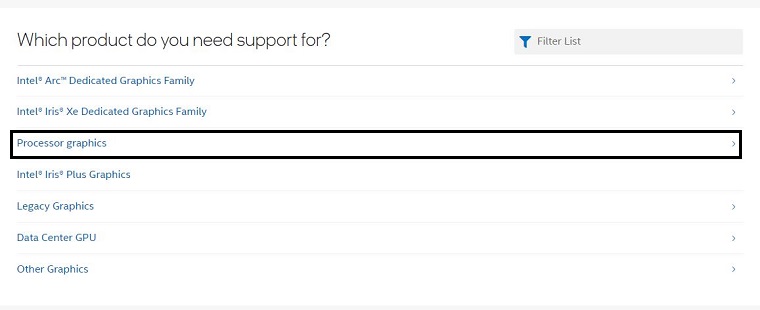
For Intel Users;
Step 1: Open the Support for Intel Graphics page on the Intel website.
Step 2: Select the Graphics Family for your GPU by clicking on it.
Step 3: Click on your GPU model.

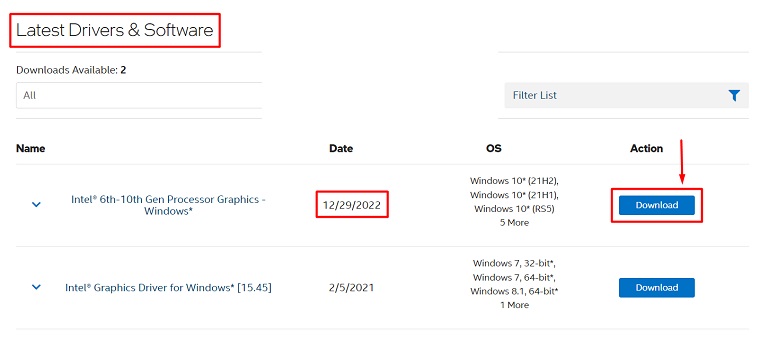
Step 4: Scroll down to the Latest Drivers & Software section or click on it in the top menu.
Step 5: Download the driver with the latest Date by clicking the Download button.
Step 6: After completing the download, run the downloaded file and follow the instructions.
Step 7: Restart your PC after the installation is completed.
Can Updating Drivers Improve My FPS?
Absolutely! When the company that made your computer part keeps it working better, they send you updates. These updates make things faster, especially when you’re playing games. So, it’s super important to ensure your computer gets these updates to make your games run smoothly and stop them from crashing.
Even though the hardware will stay the same, driver update will allow better FPS and performance.