Over the years, PC gaming is become popular and it’s a great way to experience the latest and greatest games, but it can be frustrating if your PC is not performing well.
Windows 11 is one of the most flexible gaming platforms. Players can upgrade desktop PCs by adding more RAM and better graphics cards. Doing that is one surefire way to improve Windows PC gaming performance.
If you are experiencing low frame rates, stuttering, or other performance problems, there are a few things you can do to improve the performance of your PC for gaming.
In this article, we’ll guide you through all the effective steps which can improve your overall gaming experience. So, let’s take a look.
What is Better Gameplay vs. Better Graphics?
When you play games on your computer, you have to decide if you want them to play really well or look super nice. Making your games play better usually means changing some things so they run smoothly and don’t get slow or jerky.
But here’s the tricky part – sometimes making games play better might make them not look as nice. So, it’s like choosing between having really smooth gameplay or having the best graphics. The tips below are mostly about making games play better on Windows, but some might also make them look a bit better.
How Can I Improve PC Performance For Gaming On Windows 11/10/8/7
To improve the overall gaming performance, you have to perform the following quick tasks;
- Close Unnecessary background Apps.
- Update your GPU’s graphics driver.
- Use Ethernet rather than WiFi.
- Check and Monitor the GPU Temperature.
In case the performance still doesn’t improve, then try the below potential tasks;
1. Enable High-Performance Mode
To improve your PC gaming performance, you have to set the game in high-performance mode. To do so, follow the below steps;
Step 1: Start the Run app by pressing the Windows logo + R buttons on the keyboard.
Step 2: Open power settings by inputting this command into Run and clicking OK: powercfg.cpl
Step 3: Click Create a Power Plan in the Control Panel applet that opens.
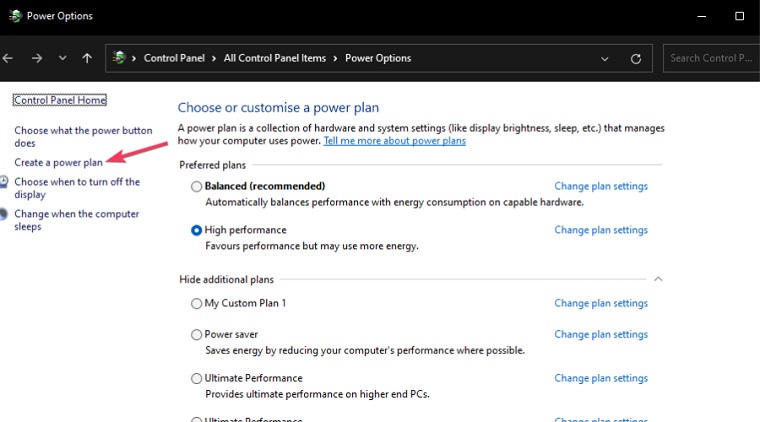
Step 4: Select High Performance and click on the Next button.
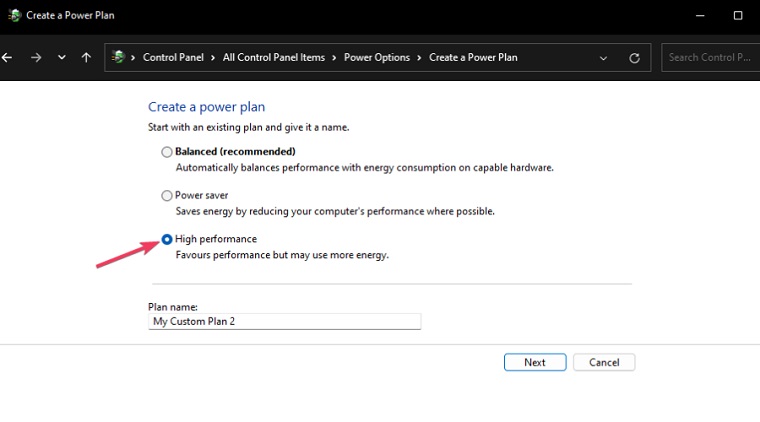
Step 5: Press the Create button to save the plan.

Step 6: Select the high-performance plan you just created.
2. Set Your Monitor’s Highest Refresh Rate
To set your monitor’s highest refresh rate follow the below steps;
Step 1: Activate the tool for finding files with its Windows logo + S key combination.
Step 2: Enter advanced display settings inside the file finder tool.
Step 3: Select View advanced display info to bring up Settings.
Step 4: Click the Choose refresh rate drop-down menu to select the highest refresh rate setting.

You can also select refresh rate options within in-game graphics options. Make sure the refresh rate is set to the highest option available within in-game settings as well.
3. Turn On The Game Mode
Turning on the gaming mode will help you to make your PC better for gaming.
How to Turn On the Game Mode on Windows 11/10/8/7
To do so, follow the below steps;
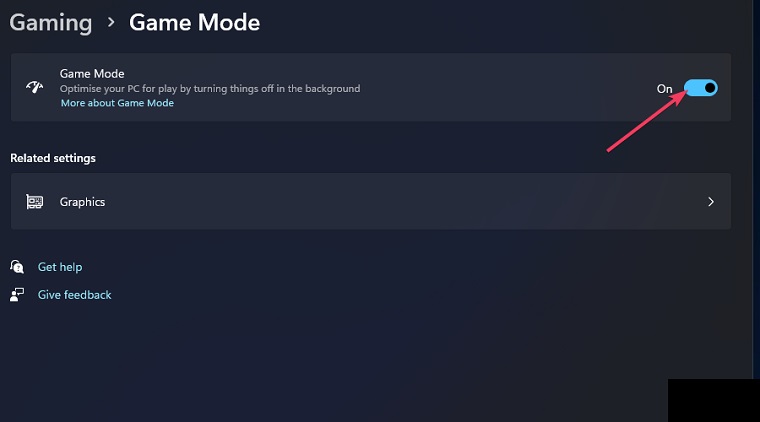
Step 1: Open Windows 11’s search tool and enter Game Mode there.
Step 2: Click on Game Mode settings.
Step 3: Turn on the Game Mode option, which turns off background processes when enabled.
4. Deselect the Enhance Pointer Precision Option
Follow the below steps;
Step 1: Activate the search box and input a mouse pointer keyword there.
Step 2: Click the Change mouse pointer display or speed search result.

Step 3: Select the Pointer Options tab.
Step 4: Uncheck the Enhance pointer precision checkbox if it’s selected.

Step 5: Select Apply to set the mouse settings.
Step 6: Click the Mouse Properties window’s OK button.
5. Adjust In-Game Graphical Settings
You can make your games look better or play faster by changing settings. If you want them to play really fast, choose lower settings, but then they won’t look as nice. Most games let you pick from low, medium, high, or very high settings.
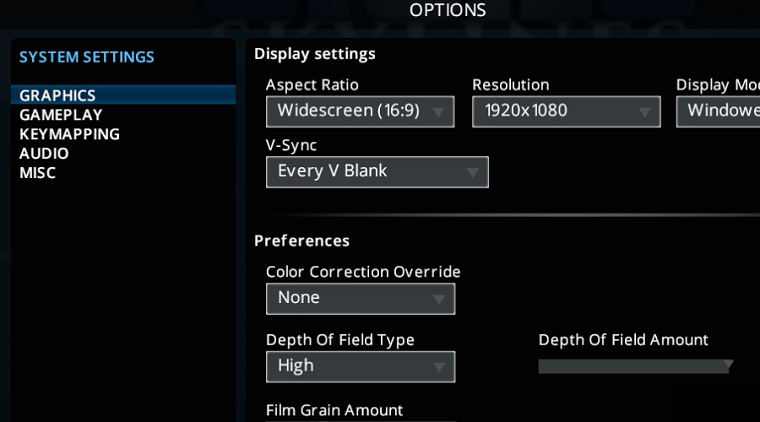
Choosing a lower resolution makes the gameplay faster, but it might not look as clear. Fancy things like ray tracing can make the game look amazing but might slow it down, so it’s better to turn them off if your computer isn’t super powerful. The better your computer is, the higher the settings you can choose for nice graphics and fast gameplay.
6. Optimize Games Using GeForce Experience
If your PC has an NVIDIA graphics card, you can probably optimize your games with the GeForce Experience software. To do so, you have to follow the below steps;
Step 1: Right-click the NVIDIA system tray icon to select GeForce Experience.
Step 2: Click the More menu button to select Scan for games and apps.

Step 3: Hover your cursor over a game thumbnail and click Details.
Step 4: Click the Custom Settings (spanner) icon to bring up an optimization bar.
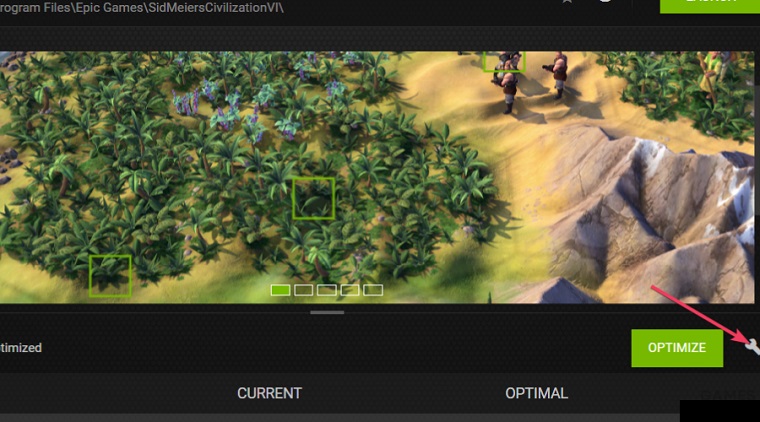
Step 5: Drag the bar’s slider left to reduce the game’s graphical settings for better gameplay performance. Or drag it to the right to set the most optimal graphical settings for your PC.
Step 6: Then select the Apply option.

If you want your game to look super nice, just click the green Optimize button. It sets the best graphics, but remember, super nice graphics might make the game not play as fast. NVIDIA GeForce Experience is a tool that helps with this, and it’s usually on PCs with NVIDIA. If you don’t have it, you can download it from the GeForce Experience page.
Doing these things will make your games look and play better on your computer. But if your computer is not super fancy, you might need to change some settings to make the games work really well. So, it’s like picking between super nice graphics or games that play really fast.
In case, you don’t understand how you can optimize your PC for better gaming performance, then watch the following video for your ease;
